If you've ever wondered how to make wig from own hair with a natural finish that lasts, this comprehensive, step-by-step resource is created for DIY enthusiasts and beginners who want salon-quality results at home. This guide explains materials, preparation, cap construction, ventilating or sewing techniques, finishing, care, and styling while using accessible tools. Whether you plan a full wig, a partial topper, or a patch for hair loss, you'll find clear instructions and best practices to help your project succeed.

Using real hair collected from your brush or a stylist session gives several advantages: authentic texture, perfect color match, and less chance of unnatural shine. When you learn how to make wig from own hair, you gain control of quality, hair sourcing, and longevity. Natural hair ventilated or ventilated-like knotted constructions can be refreshed, styled with heat, and dyed carefully to match complexion.
Prepare quality supplies before starting: hair (your shed hair, trimmed ponytail, or purchased matching human hair if needed), a mannequin head or wig block, wig cap, elastic band, wig pins, ventilating needle or ventilating tool (for lace), sewing needle and strong thread (nylon or polyester), ventilating knotting thread if making a lace wig, shears, thinning shears, clips, measuring tape, lace adhesive or spirit gum (if needed), heat tools for styling, and a fine-tooth comb. For those sewing wefts, you may also want a sewing machine adapted for lace or a curved needle for hand sewing.
The foundation is clean hair. If you plan to use hair from haircuts, tie each small ponytail with elastic, keep them in a sealed bag, and label texture. For individual strands, sort by length and texture. Wash with a sulfate-free shampoo and deep condition to restore moisture. Avoid heavy oils or silicones that can build up on the base of a wig. After washing, gently detangle and air-dry or use a low heat setting. For best results when learning how to make wig from own hair, align cuticles by letting hair dry naturally or using a cool-shot setting.
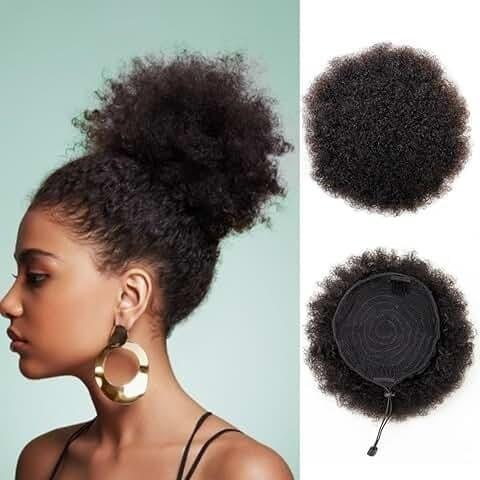
The cap defines the feel and breathability. Lace front caps allow a natural hairline and are ideal for ventilating individual strands. Mesh or weft caps are simpler for sewing hair in tracks. If you are attempting lace ventilating, choose fine Swiss lace for an invisible hairline. For weft sewing, select a cap with reinforced tracks or use a dome cap and hand-sew wefts in concentric circles. Consider a stretch cap for comfort and an adjustable elastic behind the nape for fit.
Convert your collected hair into usable pieces: align strands and sew them into wefts using a sewing machine or by hand with a backstitch. Keep weft rows narrow to create a more natural density. When learning how to make wig from own hair, keep preview patches to test how the hair behaves on the cap. You can also create small weft strips to fill sparse areas instead of full wefts, which can increase realism and reduce bulk.
Ventilating is the process of knotting individual or double strands into lace. Use a ventilating needle or handmade hook to pull hair through the lace and tie a knot. A single knot gives less bulk and a single-hair look; double knots offer more security. Practice on scrap lace before working on your final cap. For an undetectable hairline, ventilate using shorter strands or create baby hairs by trimming minute sections at the perimeter. When explaining how to make wig from own hair, emphasize patience—ventilating is time-consuming but yields the most natural result.
If you prefer sewing, mark the cap’s circumference and sew wefts from the nape upward in concentric rows. Secure the first row tightly near the nape to ensure stability. Use a curved needle and double thread for durability. Leave the front section for hand ventilation or attach a pre-made lace front to combine both methods. This hybrid approach is popular with DIYers learning how to make wig from own hair who want both speed and a realistic hairline.
To create a realistic hairline, ventillate shorter hairs randomly along the lace front, avoid symmetric placement, and thin the roots slightly with thinning shears. For a natural part, bleach knots on lace to make the scalp effect or pluck parting lines to create softness. For those who dislike bleaching, laying a light powder of foundation along the lace can mimic scalp color. Be conservative with bleaching—too much can weaken hair attachment.
Once attachment is complete, test the fit and secure the cap with elastic or an adjustable band. Trim, style, and refine density. Add baby hair and lay edges with a small amount of gel for a seamless look. If using adhesive, follow product instructions and test on a small area first. For longevity, stitch rather than glue whenever possible—sewing provides more durable hold when you know how to make wig from own hair properly.
Your own hair can be heat styled and colored, but with caution: repeated high-heat styling reduces lifespan. Use lower heat settings and heat protectant. If color matching becomes challenging, consider blending purchased human hair with your own strands to achieve even tone. When dyeing the final wig, always perform strand and porosity tests. If you used a lot of shed hair, results can vary because strand age and porosity differ.
Proper care extends wear: wash gently with mild shampoo, condition thoroughly, and avoid machine tumbling. Store your wig on a mannequin head to maintain shape. Sleep with a silk or satin bonnet. For lace wigs, re-bleach or redo knots if necessary and consider professional lace repair after heavy wear. Regularly sanitize combs and pins to prevent product build-up and bacteria transfer.
When facing issues, revisit the foundational steps: hair prep, cap placement, and attachment technique. The more methodical you are when learning how to make wig from own hair, the fewer adjustments you'll later need.
Repurposing your own cut hair reduces waste and can be economical. Save hair from trims, collect shed hair, and coordinate with local tailors or hobbyists who may donate or swap supplies. When learning how to make wig from own hair, small investments in tools pay off across multiple projects.
Consider micro-wefting, hand-tied foundations, or machine-made wefts sewn into a custom cap. For experienced DIYers, combining lace fronts with hand-tied crowns offers the best blend of realism and durability. Micro-knots paired with breathable caps make wigs comfortable for daily use. Use lightweight lining to reduce friction and protect hair roots.
Pro tip: Keep a swatch book of your hair samples, labeling porosity, length, and texture. This helps when mixing with purchased hair or trying to recreate a previous project.
Handcrafting a full wig from scratch is time-intensive. Ventilating a full lace front can take many hours; expect longer for beginners. If time is limited, sewing wefts onto a cap offers faster turnaround. Still, understanding how to make wig from own hair allows you to incrementally build skills and projects—start with a small topper or frontal section before tackling a full wig.
Sanitize tools and sleeping surfaces to avoid infections or product buildup. If you experience scalp irritation with adhesives, consider alternative attachment methods like combs or clips sewn into the cap. When using chemical treatments (bleach or dyes), work in a ventilated area and follow product safety instructions.
Practice on inexpensive lace to get comfortable with knotting and tension. Join online maker communities for feedback and pattern templates. Seek out tutorial videos focusing separately on ventilating, sewing wefts, and cap blocking to build stepwise confidence. Apply small projects first—this approach demystifies how to make wig from own hair and develops repeatable skills.
By following a consistent workflow and documenting your steps, you can refine methods and reduce wasted materials. Keep a project journal: note thread type, knot size, and cap tension so you replicate your best results.
If you need a medically precise fit (for chemo patients or severe hair loss), consult a certified wigmaker for measurement and sensitive-skin adhesives. Professionals can also perform delicate color corrections and durable lace work if your DIY attempt isn't meeting expectations. Learning how to make wig from own hair is empowering, but collaboration with pros can raise quality while you gain experience.
With quality hair and careful care, custom handmade wigs can last months to years depending on use. Regular maintenance such as tightened tracks, knot reinforcement, and reconditioning prolongs lifespan. Plan a refurbishment schedule: light clean and reshape monthly with heavy rework every 6-12 months, depending on wear.
Making a wig from your own hair is a rewarding craft that blends technical skill with creative styling. Whether your priority is realistic appearance, comfort, or conservation, the techniques in this guide offer a roadmap to success. Mastering how to make wig from own hair takes practice—start small, stay patient, and iterate on your technique.
A1: Using primarily short trims limits length and may require blending with longer hair or extensions. For short hair, create a topper or partial wig, or collect trims over time to assemble longer wefts.
A2: Durability depends on construction. Hand-ventilated lace with strong knots and reinforced wefts sewn on a durable cap can match or exceed commercial wigs. Proper care is essential for longevity.
A3: Bleaching knots can lighten the visible knots for an invisible look but should be done cautiously. Over-bleaching weakens knots; practice on sample lace first and neutralize with a toner if needed.
Now that you have the roadmap, tools list, and method variations, you're prepared to begin. Remember that mastering how to make wig from own hair is an iterative journey—each project improves technique and confidence. Good luck and enjoy creating a personalized, natural-looking wig that truly reflects your style and resourcefulness!